Bid Leveling in Construction: Choose The Best Subcontractors For The Job (Fast)
Written by Bridget Cooper

Bid leveling is one of the most important yet sometimes overlooked steps in pre-construction. It allows you to go beyond the surface numbers during bidding and select a subcontractor with the best overall value.
Don't choose a bid just because it has the lowest cost. That's an unwritten rule in bid evaluation. Why?
It’s possible that the bidder with the lowest total cost left out some important requirements in their bid. Some subcontractors also underbid just to get the job, and then try to make up for the low price with change orders, cutting corners, and using lower-quality materials.
Guess who gets blamed when the project is delayed and you start requesting additional funds? Don't undermine your credibility and ruin your chances of securing future construction projects.
Follow along as we discuss what bid leveling is, how it works, and why it is important. We will cover the exact step-by-step process to level a construction bid including how to automate the process so you can get to building fast.
What Is Bid Leveling?
Bid leveling is the process of choosing the best bid by doing a side-by-side comparison of all the received bids. Typically, you’ll have columns for different subcontractors and rows for each project requirement.
The granular line-by-line comparison makes it extremely easy to flag any requirement missed by a sub and to also compare their strengths and weaknesses.
Historically, bid leveling has been a time-consuming task that requires you to manually transfer the client’s project requirements into an Excel sheet and then add each bidder's information to the sheet for comparison.
The high amount of work involved has created instances where contractors resort to shortcuts to finish quickly or unknowingly make errors that can be costly if undetected.
The good news is we are in the age of automation, and now you can leverage AI to simplify the process.
We will explore both the manual and automated bid leveling process, and then you can decide which route works best for you.
Benefits Of The Bid Leveling Process
- More accurate decision making - You are not just selecting the bidder with the lowest price, but one who meets the full requirements of your project. This will save you a lot of headaches down the road in the form of disputes, delayed work, and bad reviews from the project owner.
- Saves on cost - Project requirements and price are agreed on before the work begins which minimizes the chances of costly revisions and disputes in the future. Bid leveling has been proven to reduce the overall construction cost by 8-10%
- Identify scope gaps - Bid leveling allows you to easily determine what’s missing from a subcontractor bid. It can also help you identify items that you missed when preparing your project scope.
- Saves time - Rather than having to sort through four or five proposals separately, you perform a line-by-line comparison for all of them at once.
- Transparency - The bidding subcontractors and your client have a complete picture of how you made your decision.
Summary Of The Bid Leveling Process
As part of the bid leveling process, several key steps are undertaken to ensure a thorough evaluation. These include:
Pre-Bid Leveling
- Identify Bid Packages: Go through the specification and plans to identify bid packages.
- Send Bid Invites: Invite subcontractors for various bid packages.
- Setup Bid Tabs: Create a bid tab for each package.
Initial Bid Tab
- Identify Major Components: Start your takeoffs of the project, assigning items to bid tabs and noting their sources.
- Bid Subgroups: Include these based on the owner-requested Bid Form.
Bid Tab Refinement
- Initial Communication: Make phone calls to discuss the scope of work with subcontractors.
- Scope Gap Identification: Compare notes and add gaps to the master Bid tab list.
- Inhouse Operations Team Consultation: Discuss general requirements for each subcontractor, like concrete work specifics.
On Bid Day
- Enter Bidder Information: Include scope descriptions and pricing on Bid Tabs.
- Scope Item List: Continue adding to your list based on subcontractor input to create a master scope list.
- Bid Clarification Emails: Send these out for verification of included items.
Bid Adjustments
-** Request Updated Bids:** Ensure all items on the master list are included, especially if they were previously excluded.
- Use Plug Numbers: Adjust each bid to include costs for all items.
Risk Analysis
- Compare Overall Bid Price: Assess which bids are complete and which need adjustments.
- Ongoing Project Review: Add additional tabs and breakouts as new requirements are discovered.
How To Level A Construction Bid Step-By-Step
In a nutshell, bid leveling in construction follows these basic steps.
Create a clear scope of work based on the project drawings and specifications. This will act as the foundation to create your leveling sheet.
- Invite to bid
- Transfer the information on the bids to a leveling sheet
- Compare the bids to spot any discrepancies. i.e. Inclusions and exclusions by each bidder.
- Reach out to the subcontractors for clarification on the discrepancies.
- Make your decision.
These steps can be further grouped into three stages that we are going to discuss in more depth.
Stage 1: Pre-Bid Leveling
This stage represents the steps you take before inviting to bid and it can make or break your bid leveling.
We recommend that you go over the client's plan and drawings and come up with a set of requirements for the construction project. It's the first step in creating your leveling sheets and the subcontractors will thank you for it.
You can’t rely on the WAG (Wild ass Guess) method and then complain when the bids you get are all over the place.
Start by defining the specific tasks to be performed. For instance, instead of just saying "concrete work", break it down into specific tasks such as rebar caps & protection, shoring & reshoring, surface finish, embeds installment, etc.
Additionally, create a detailed bill of quantities and state the projected timeline and expected number of labor hours. Make sure to add a copy of the written plan and technical drawings for the subcontractors to reference.
Also, include a list of required submittals for bid qualification such as record keeping, bonding, insurance, safety program, and payment terms.
The more detailed your scope of work is when sending out the requests for proposals, the easier it will be to level the bids.
Stage 2: Invitation to Bid
Take the time to solicit bids. The more options you have the higher your chances of getting the best price/quality. It also helps you get different perspectives on the work to be performed which can help you discover an item that you had missed in your scope.
At the same time, you don’t want to send too many invitation for bids. Some contractors may get turned off by this as it gives the impression you are fishing for the lowest price rather than the best quality. You should consider telling your bids to contractors, but only after the contractor has already provided their estimate first.
Not to mention that dealing with multiple bids will take more time and effort.
PS: Subs don’t like platforms that force them to input their bid deliverables as checkboxes. They will always prefer to upload/submit a bid on their letterhead preferably in PDF format.
Stage 3: Bid Leveling and Selection
The bids have come in and it’s time to select your sub. Here are two ways you can go about it.
1. Manual bid leveling using Excel sheets
Step 1: Initial Setup.
Make a copy of this bid-leveling template.
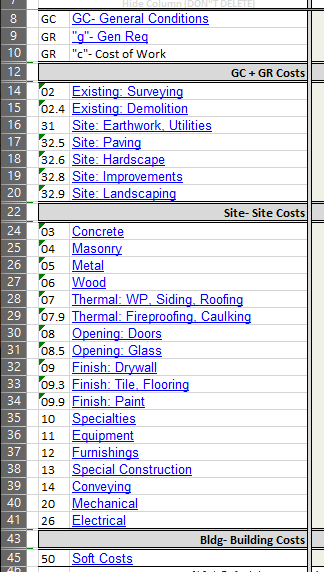
Set up the tabs that you will need based on the scope of work. Select from standard tabs “02” to “50” and delete the tabs you won’t be using.
- BidDay File Review: Set up necessary tabs and delete or modify unnecessary ones.
- Specifications Review: This simplifies the process, especially for sections 7, 10, 11, 12, 13, and 14, detailing various items provided by different subcontractors.
- Material Identification: Without specifications, go through drawings to identify needed materials.
Step 2: Tab setup
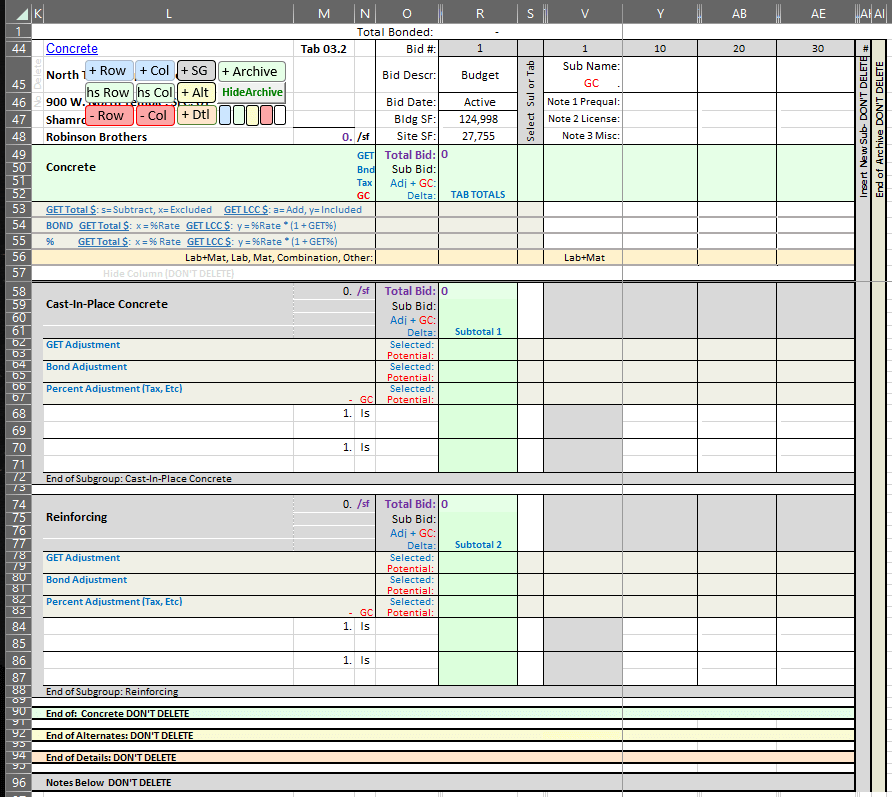
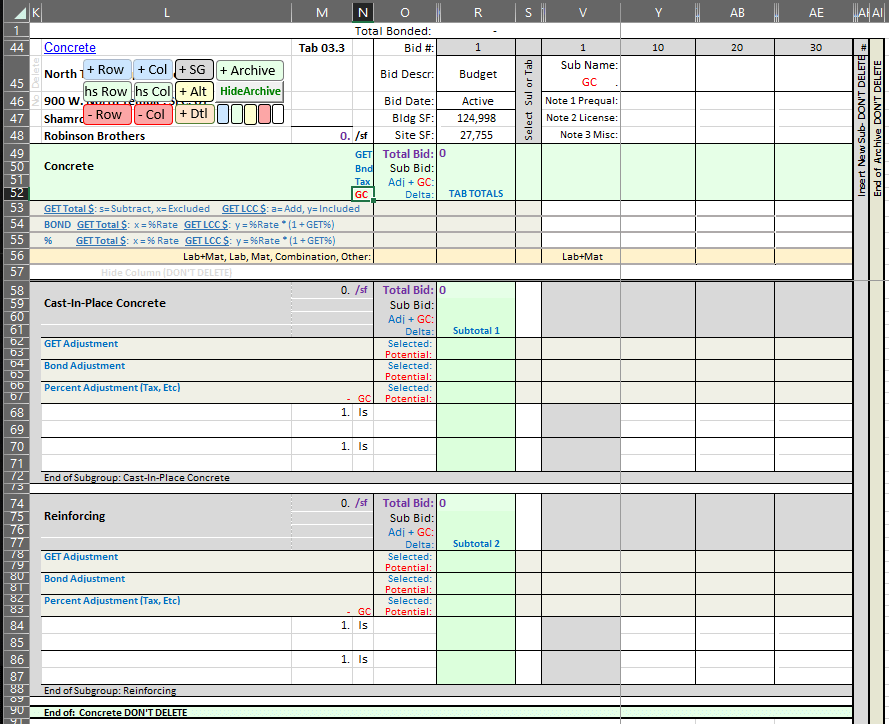
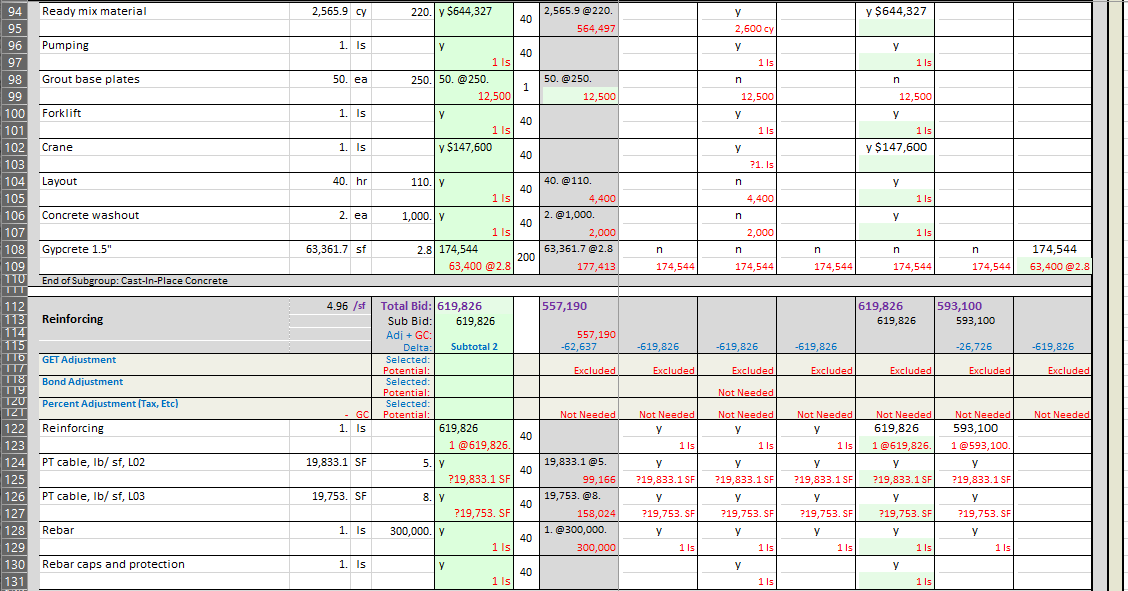
We will use concrete work for demonstration. Break down the bid based on the project scope, and add “Subtotals” for each item. For example, the owner might want concrete broken into “Cast in Place Concrete” (Subtotal 1) and “Reinforcing” (Subtotal 2).
Note: You still have a “TAB TOTALS” at the top of the sheet which includes all of the “Subtotals”.
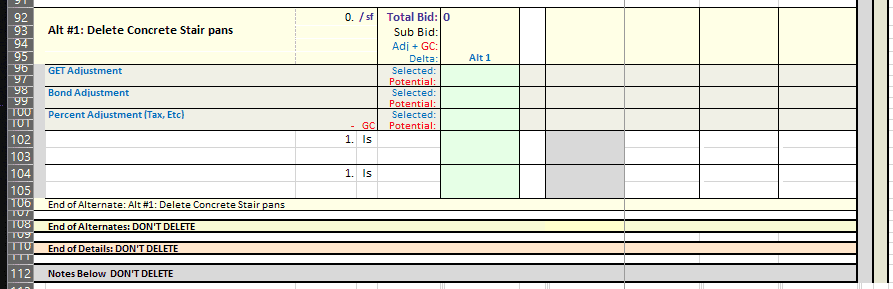
Step 3: Dealing with alternates
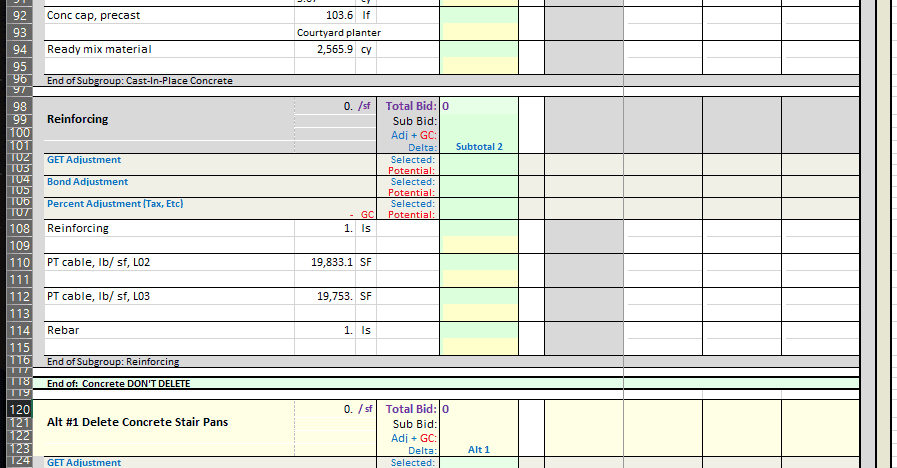
Add “Alternates” as per the client's requirements by using “Alternate” totals. Let’s say the owner doesn’t want concrete stair pans, so add an “Alt #1: Delete Concrete Stair pans”
**Note: **Totals for the “Alternate” are not included in the overall “TAB TOTALS” at the top of the sheet.
Step 4: Add the items from your takeoff
Each item has two rows of information that can be entered. Typically, you would have the description, quantity, unit, and unit price on the first row.
On the second row, you can add a second quantity, drawing reference, additional comments, or anything else that would be helpful.
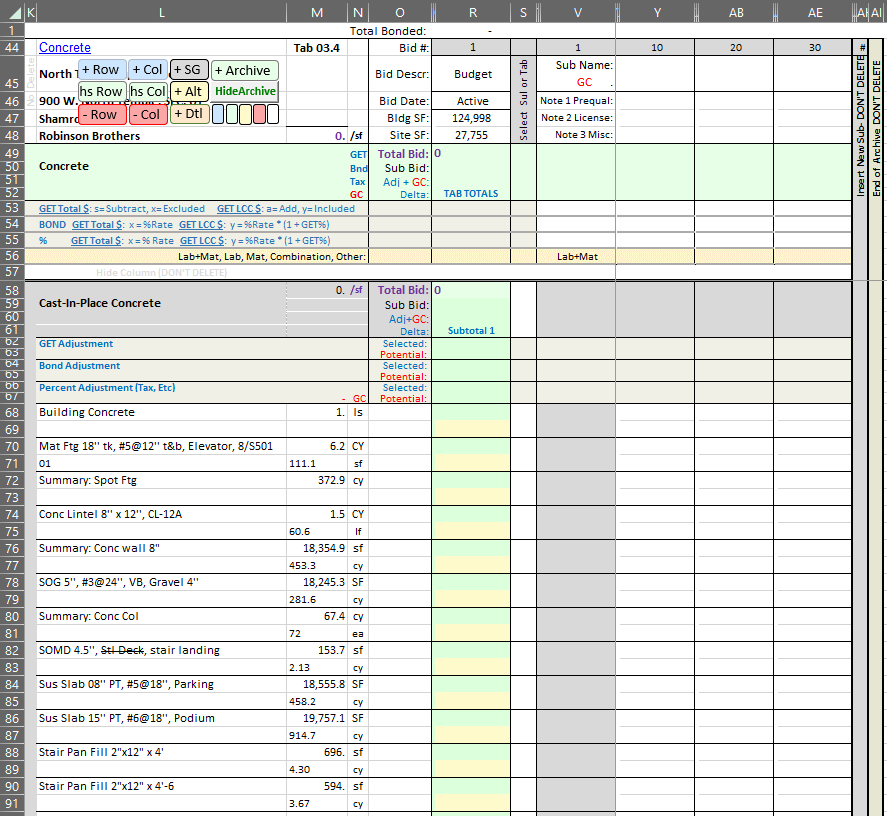
Step 5: Add your budget for each item
Input budget unit pricing in column “O”. This will result in a budget in column “V”.
The budget is “red” and on the second line of the item. All adjustments, changes, estimates, or plugs are “red” and on the second line of the items.
Step 6: Add items from operation team
This will include items that the operations team wants the subcontractor to include in their bid. See items highlighted in yellow.
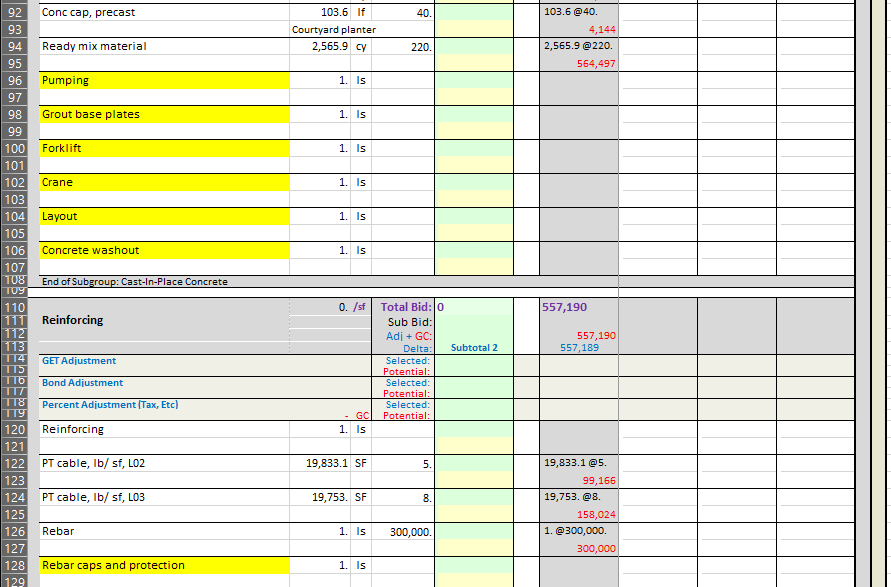
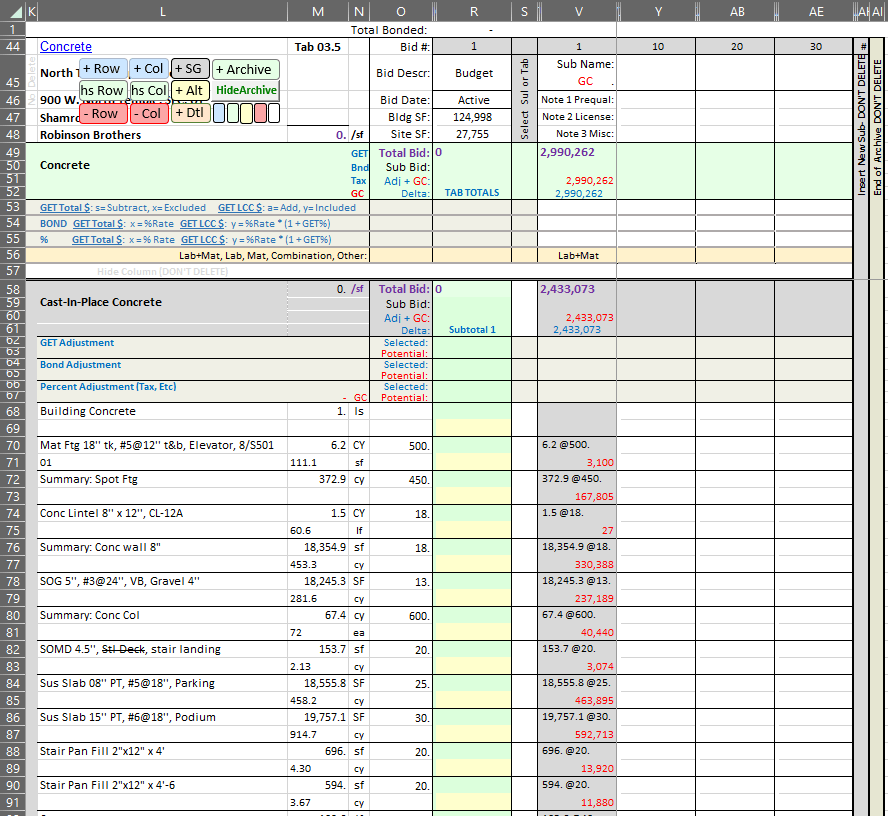
Step 7: Add subcontractor bids
Input on the first-line pricing from the sub. Items on the first line are “Black” and are included in the “Black” total at the top of each “Tab” and each “Subtotal”
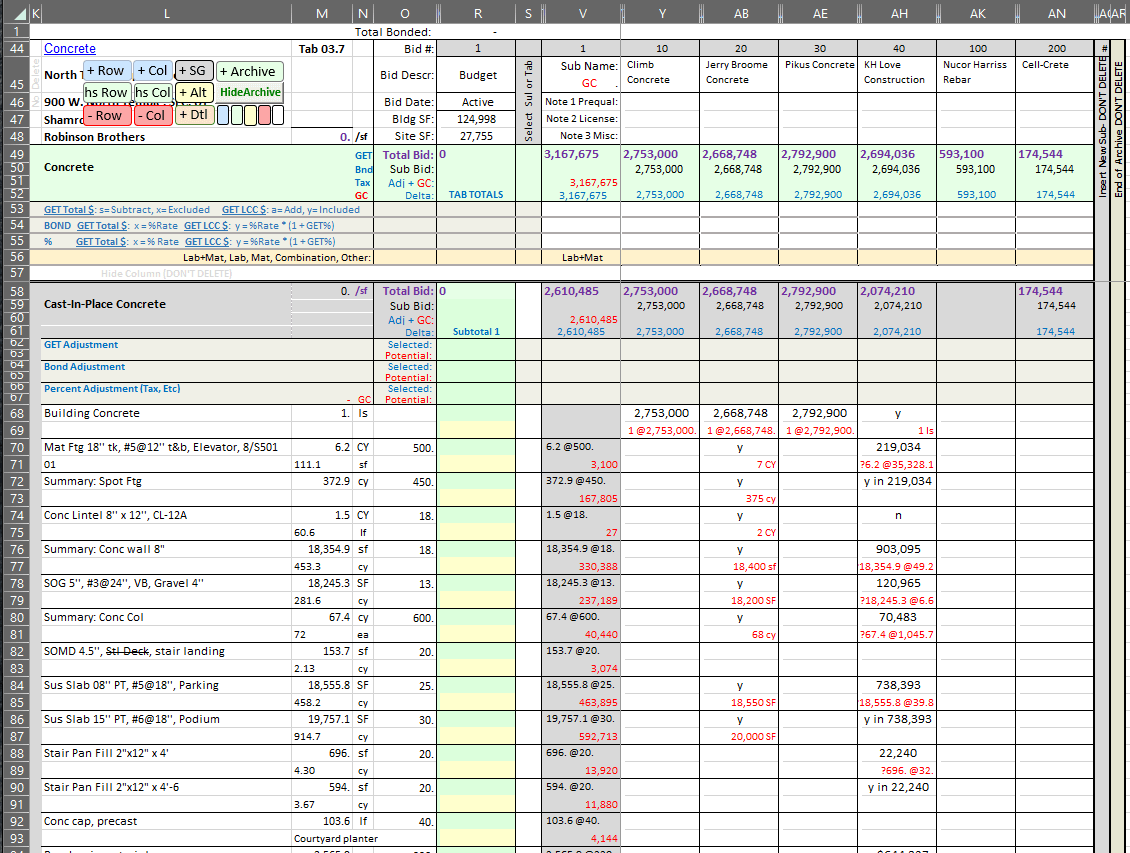
Use “Y’ for items included and “n” for items not included. You can also add new items to the tab based on the bids you receive. In this case, gypcrete was added after reviewing the bids.

Enter quantities if included in the bid on the second line. These quantities can be compared with the takeoff quantities.
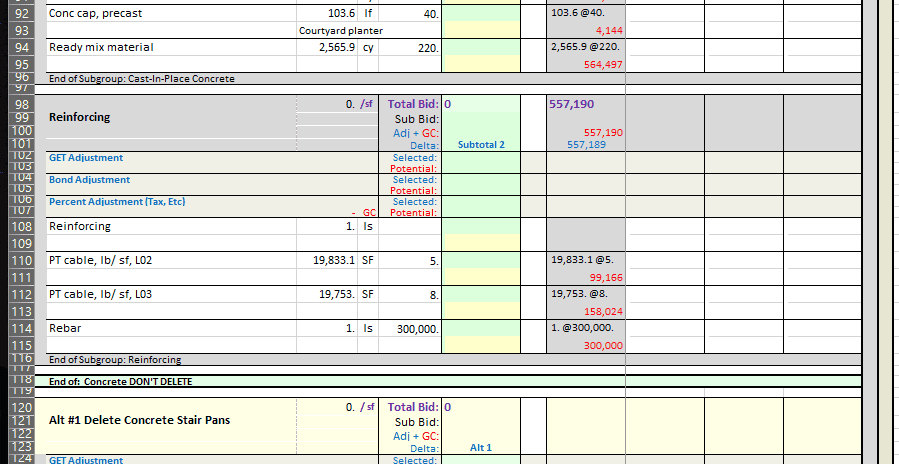
Note that the quantities have a unit associated with them. They are not included in the “Red” total at the top.
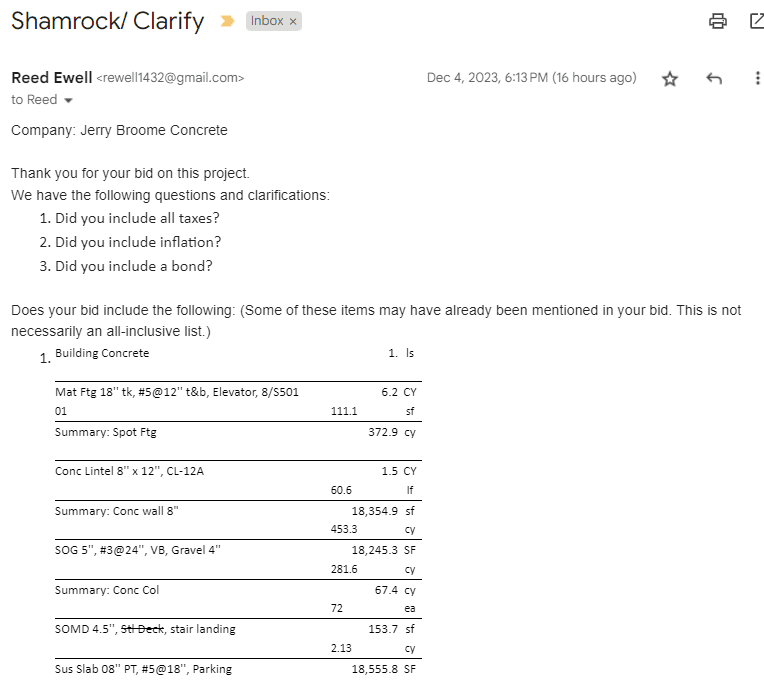
Step 8: Seek clarification from the subcontractor
Reach out to the subs if you need further action from them. Maybe they missed an item that you need them to add. Include the updated scope of items in your email.

Step 9: Bid Adjustment
Update bid from subs based on response to the clarification email sent out.
Use plug numbers to adjust each bid so costs are included for all things. In the example, we have only leveled the bid between Jerry Broome Concrete and KH Love Construction, and KH stands as the sub with the lowest bid.
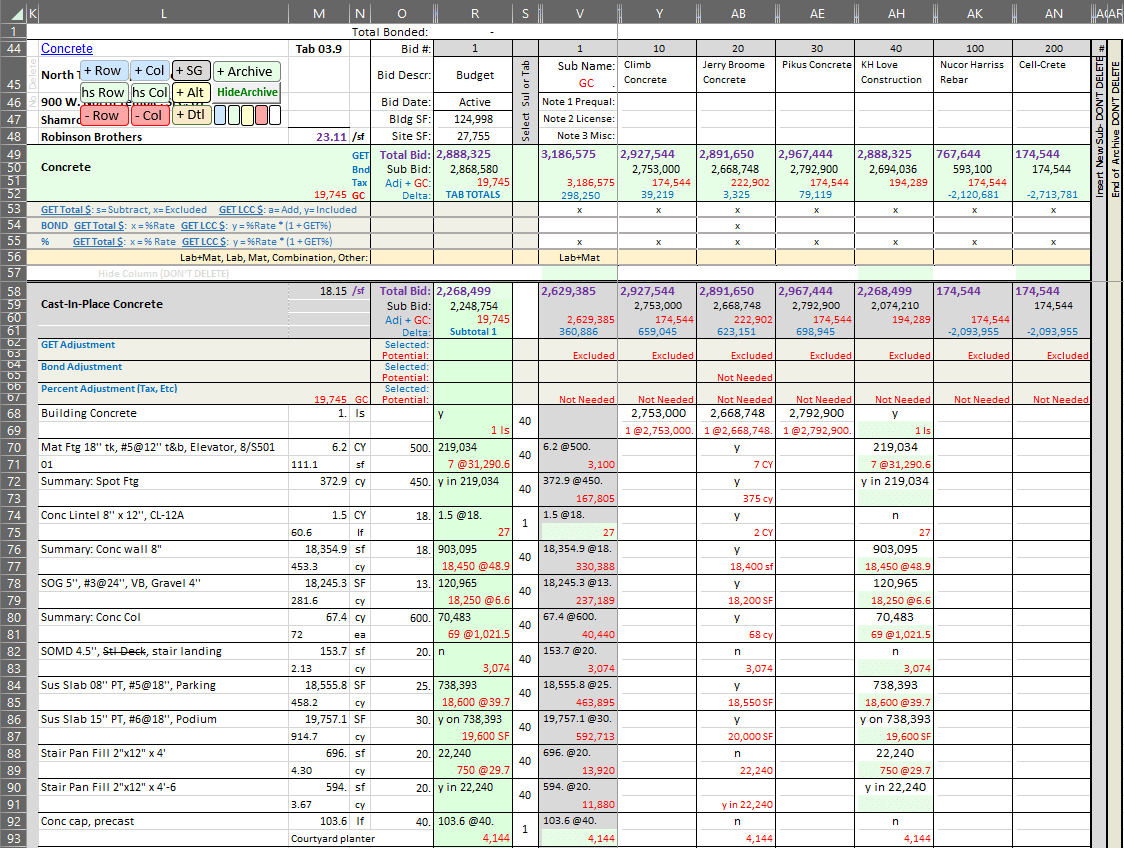
Step 10: Risk Assessment
Compare the overall bid price, the amount of adjustments needed to make the bid whole, and the qualification of the bidder.
Also, factor in the prequalification status of the Subcontractors. In this example, KH Love Construction is not prequalified and Jerry Broome Concrete is prequalified. Consequently, we have to add a bond of 2% to KH Love Construction. That amounts to $41,484 + $12,397 = $53,881 which takes KH Love Construction's total cost higher than Jerry Broome Concrete Low.
A perfect example of how the initial total cost of a bid can be misleading.
Now, let's look at the alternative bid leveling process.
. Automated bid invites using Downtobid
Downtobid is the first construction-focused bid software leveraging AI to simplify bid invitaitons. It is not a bid leveling tool, but rather focuses on identifying bid packages in construction drawings and efficiently creating custom subcontractor invite lists.
Here is a standard example of how using Downtobid looks like:
Upload the client's drawing and written plans. Our platform automatically identifies the scope categories in drawings.

With Downtobid you get access to an updated subcontractor database complete with all key information. Our AI also helps you personalize the ITB to increase your chances of getting a response.
We are turning a previously time-consuming and error-prone task into a quick, precise, and stress-free experience. Instead of doing everything from scratch, our AI lays the groundwork and then your job is to go through the completed document checking for accuracy.
To recap, here is everything you get when you choose us.
Benefits Of Using Downtobid
- AI-powered assistance every step of the way. Simply upload your project plans and Downtobid will produce complete bid packages and create personalized ITBs. See why we are a top bid invitation software.
- An updated subcontractor database. An alternative to existing databases that come with various issues such as trades that are not mapped correctly to CSI codes and missing information such as contact data, union status, MBWE certification, or type of work done.
- A plan room where we collect behavioral data on how subs are interacting with your project. The plan room has also been revamped to add features.
- A provision for leaving feedback on subcontractor bids to promote transparency.
Conclusion
Whether you do it manually or automatically with software, the one thing we can agree on is the significance of bid leveling. Yes, it helps you pick the most affordable contractor. But most importantly, it's a way to mitigate future risks. The more thought you give into the pre-construction stage the more seamless the construction stage will be.
Do what every smart contractor does and incorporate bid leveling in your bidding process.
Ready to ditch the old way of doing things and embrace the future? Sign up with us to get started.